We are putting a great emphasis on chick brooding since this is one of the most important phases of the chickens’ lives and of your investments. Failing to carry out proper brooding may simply wipe out your poultry investments.
There is no reason why should you lose a large number of chicks during the chick brooding stage when the conditions required for successful brooding are easily manageable. Experienced farmers who follow the best practices when it comes to chick brooding generally see over 99% survival rate during the first 8 weeks which preserves their investments. Farmers who are less experienced can see as much as 20% losses in the first eight weeks which guarantees that you are going to make losses no matter how hard you try afterwards.
Successful chick brooding is an art that you can master easily. Chick brooding requires that you provide the right amount of artificial heat that will help the chicks in temperature regulation so that they can successfully adjust to life outside the egg yolk. There are many sources that you can use for chick brooder heat. These include the following:-
- Electricity
- Gas
- Charcoal
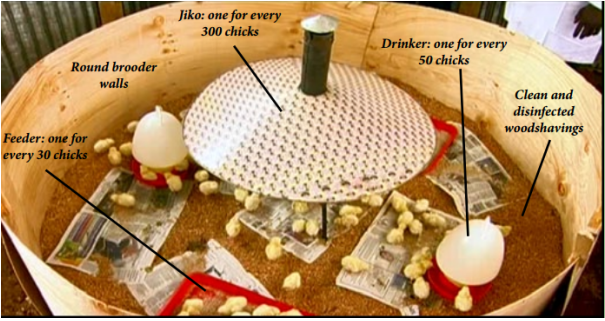
You must ensure that you have set up the brooder area at least 24 hours before the arrival of the chicks. The brooder should contain the following:-
- Heat source
- Feeders: At least one per 30 chicks
- Drinkers: At least one per 50 chicks
- Feeding trays
- Surround: There are pre-made brooders made of metal or plastic. If you are planning to cut on costs, you can simply make this with a cardboard box. The diameter can be about 4m and the height 0.6m.
Based on weather conditions of the area where you are planning to carry out the chick brooding, turn on the brooder at least 6 hours before the arrival of the chicks. This will ensure that the environment of the brooder, house, feeds and water is at the right temperature by the time the chicks will be arriving. The day-old chicks that you have purchased should be placed inside the brooder within 6-12 hours after hatchery in order to avoid putting them under too much stress. If the time between the chick hatching and chick placement inside the brooder is extended beyond 12 hours and up to even 24 or 48 hours, the chicks are going to be adversely affected and you may begin to see a high mortality rate.
Before you place the chicks in the brooder, supply clean drinking water and spread feed on newspapers placed on top of litter in the brooder as well as in the feeding trays. These should be distributed evenly throughout the brooder area. You can add liquid paraffin, glucose or vitamins to the water which they are drinking. This will offer the chicks a ready energy sources and will also help them in overcoming caused by the dislocation or travelling. Adding liquid paraffin to the water their drinking helps them in passing stool.
When carrying out chick brooding, it is important to ensure that you have maintained the correct temperature in the brooder over several weeks. You should step down the temperature in the brooder gradually. Here is an overview of how the temperature should be maintained based on the age of the bird.
| AGE(Weeks) | Temperature in ºC at Chick Level | Temperature in ºC in the House |
| 1 | 33-35 | 30-32 |
| 2 | 30-32 | 27-29 |
| 3 | 27-29 | 24-26 |
| 4 | 24-26 | 21-23 |
In order to ensure optimal conditions for chick brooding, monitor temperatures closely by installing a few thermometers in the brooding area just at the height of the chicks in the brooder. Another good indicator on the temperature of the brooder is the behavior of the chicks.
Below is a diagram of chick behavior and various temperature conditions:-
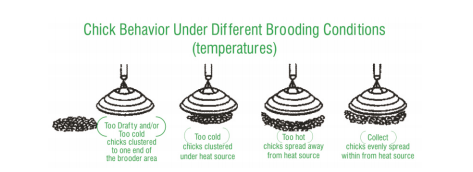
If there is excessive chick noise during brooding, that can be a sign that the chicks are not comfortable. The most common cause of discomfort in the brooder is generally improper temperature. If you don’t follow the temperature step-down in the brooder outlined above, then you are going to cause some discomfort in the chicks. Common temperature induced conditions in the chick brooder include the following:-
Chilled Chicks
- These are the chicks which huddle together under a brooder due to cold conditions in the brooder.
- They produce wet or watery droppings thus causing wet-pasted vents inside the chick brooder.
Overheated Chicks
- Overheated chicks will lie prostrate on the floor with both heads and necks stretched out on the brooder floor.
- The chicks will pant
- There is increase in water consumption by the chicks and as a result, both the crop and the intestines of the chicks is distended due to excessive water.
- The chicks will be moving away from the source of heat towards the cooler areas of the brooder. In some cases, they will be overcrowding around the drinkers.
Chilled chicks will be under stress and are likely to have higher mortality, dehydration, poor uniformity with the rest of the chicks along with an increase in ascites. On the other hand, checks which are overheated will also suffer from dehydration and will have higher mortality, stunting syndrome as well as poor uniformity with rest of your flock. In more serious cases where you completely get the temperature wrong, mortality is likely to result due to cardiovascular failure.
Expansion of Brooder Area
After every two days, the brooder area should be expanded. Within 10-14 days, allow the birds to occupy as much as 2/3 of the house. When they hit three weeks, allow the chicks to occupy the whole poultry house.
When carrying out brooding, it is also important to ensure that there is very good ventilation even if this will mean higher heating costs. Ventilation will get rid of the ammonia in the house and also ensure that the litter is always dry and this will in turn reduce incidence of diseases. The chicks will also need the fresh air from the ventilation in grow and also maintain high productivity.