Chick brooding is one of the most important phases during poultry rearing. If done wrongly, you could lose as much as 50% of your chicks or potentially wipe off your entire investments in the day old chicks. If it is done correctly, you could lose 5% or less and preserve your entire investment. Chick brooding is often compared to parenting.
Eventually, every farmer has to develop a technique that will work for them in the first 8 weeks when the chicks are most vulnerable to various threats. Even if they survive the first 8 weeks, the handling of the chicks during those few weeks will impact the entire lifetime production of the chicken. If they are well handled and they grow up with less injuries, deformities or sickness, they are going to give you a very high yield. This applies whether you are brooding the KARI Improved Kienyeji Chicken, Rainbow Roostrer, Kuroiler, Indbro, Kenbro or the Fast White Layers from India.
The Four Important Factors when it Comes to Chick Brooding
When planning your chick brooding in Kenya in order to ensure a 99% survival rate in the first 8 weeks, there are five main factors that you will need control. How you will control them will depend on the knowledge that you have acquired through training along with your own improvisations during the Kienyeji chicken farming. These include the following:-
- Provide Proper Feeding in the Right Amount: For information on how much a chick consumes at every age, check out our Feed Formulation Manual.
- Provide very clean water during these first eight weeks. Check out our blog on the importance of clean water in poultry rearing. Chicks will do OK with the current drinkers from Kenpoly which are available in the Kenyan market but as they mature, you can cut your jerricans and use them to provide cleaner water which is not easily contaminated. You can also use drip drinkers which really preserve the hygiene of water and which the chickens love pecking as they grow older.
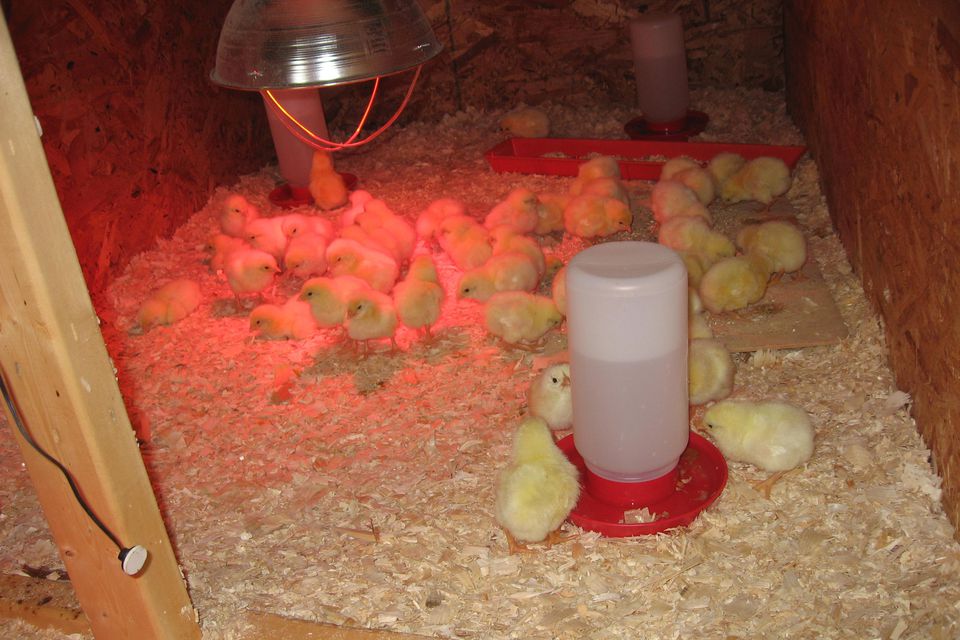
- Temperature: Should just be the right amount and even distributed in the building. You can observe the chick behaviour in order to determine whether you have provided an optimal amount of heat.
- Air Quality: Building should be spacious and well aerated but during the first few weeks, watch out on draught or wind coming in through openings. This can easily create the cold conditions that kill your chicks. In the first weeks, seal the openings with a curtain or sack in order to prevent draught and excessive cold.
- Hygiene: Wash your hands before providing food. Before you enter the chicken coop, make sure you have dipped your feet in a disinfectant.
Prerequisites for chick brooding
- Chick brooding houses should be isolated from other houses containing older birds. The producer should follow an “all-in, all-out” program, never mixing birds of different ages.
- All facilities must thoroughly be cleaned, and disinfected.
- Put the brooder in place
- Before the arrival of chicks the brood ring and heaters must be checked to ensure that they are working properly.
- Put saw dust on the floor of the chicken pen
- On arrival, chicks should be offered fresh water containing glucose where applicable
Chick Management
Watch out daily for inactive or injured chicks and separate them from the main flock. If they are sick, consult a vet and provide the required medicine in isolation. If they are just injured or weak, separate them and let them recuperate in an environment where they don’t have to compete for food. Some of the common problems that you will encounter when you have a large flock include broken legs, broken wings, blindness from pecking or injuries and infections. You have to watch the flock closely in order to respond to these problems as soon as possible. Watch out the corners or feeding areas of the chicken pens for any dead chicks and remove them immediately when you spot them.
Prevent Overcrowding
Apart from the factors listed above, another major cause of injuries and deaths is overcrowding in the chicken pen. You can solve this by building a structure of the right size that can accommodate your number of birds. Check out our Kienyeji Housing Manual for tips on the right size of the Kienyeji Chicken structure or chicken coop that you should construct.
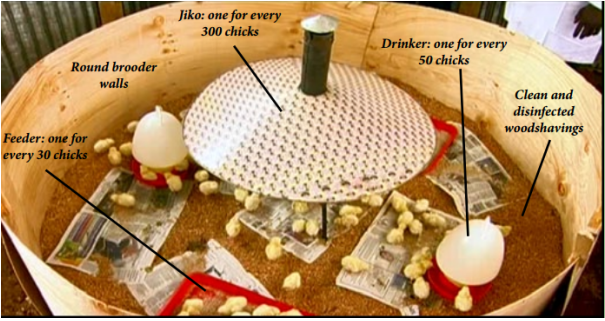
Buy More Feeders and Drinkers
Chicks also die or get injured due to overcrowding during feeding. When two many chicks are scrambling for food in small feeder, injuries are inevitable. You can solve this by having numerous feeders. A typical chick feeder can accommodate up to 30 birds but you can budget for one feeder per 20 birds. That means if you have 200 birds, purchase 10 feeders and 5 drinkers. The chicks mostly spend their time eating and drink at intervals .
Feeding Routine
Every morning and evening, ensure that all the feeders and drinkers have been washed before putting new feed in them. After feeding, there will most likely be chicken droppings and sawdust in the feeders and drinkers and these need to be cleaned first. Provide feeds two to three times a day. There is a certain amount of feed that they should consume per day based on their ages. Refer to our Feed Formulation Manual for this information.
When supplying the food, it is good to have one or two helpers. Put the feed in all the feeders and then take them to the chicken pen at once. That way, you will not attract too many chicks on a single feeder at once which can lead to injuries and death. Apart from the feeders, you can also supply an extra feeding tray where you put food for those left out of the feeders. Ensure all the chickens are active and feeding well. Remove and inspect the inactive ones.
After supplying feed, supply clean water and leave them for another six or more hours.
The Importance of Chick Brooding
The hatched chick has not developed the mechanism to regulate its body temperature, so it cannot maintain its body temperature properly for the first few weeks and can easily die due to the cold conditions of the housing.
Chick brooding management is mainly aimed at providing right temperature for the chicks in order to ensure their survival. Brooding provides extra heat from an external source to newly hatched chicks. When the artificial heat is not provided in the Improved Kienyeji chicken house, the chicks will not take sufficient feeds and water. This leads to retardation of growth and poor development of the internal organs responsible for digestion. As a result, the chick will not be able to digest the yolk completely.
The egg yolk is a highly nutritious feed for the chicks. As such, if it is not absorbed completely by the chick, there are growth and multiplication bacteria on the yolk leading to Early Chick Mortality (ECM) and growth retardation. A condition called omphalitis (yolk infection).
Preparations for the Chick Placement
The brooding house MUST be cleaned and disinfected, preferably using a sprayer. Feeders and drinkers should be washed and disinfected days before use. All equipment in the house should be arranged and the litter spread.
The brooder ring should be prepared and the curtains fixed on the open sides to insulate the brooder house. Use of a good quality terminal disinfectant, for the final spraying before the chicks are placed is recommended. Provide foot baths at the entrance with lime powder or any disinfectant such as Ominicide or, TH4.
Preparation of a Brooder Guard
Use an 18 inch cardboard sheet, aluminum sheet, coffee wire as brooder guard material to make a circle that uses 20 feet in diameter of the brooder guard for 50 chicks; 25 feet for 100 chicks; 30 feet for 150 chicks; 35 feet for 200 chicks. The brooder should be ready prior to disinfection. Fill the ring with suitable litter material such as wood shaving or straw up to 4 inches thick from the floor, and then spread newspapers to cover the litter on the floor. The heat source should be placed at the centre of the brooder ring. Please note that you can also purchase a customized brooder ring.
Checking Your Chicks
The crops of chicks should be checked the morning after placement to ensure they have found feed and water. At this time, a minimum of 95% of the crops should feel soft and pliable indicating chicks have successfully located feed and water. Hard crops indicate chicks have not found adequate water and water availability should be cheeked immediately. Swollen and distended crops indicate chicks have located water but insufficient feed and in this case the availability and consistency of the feed should be immediately evaluated.
Managing Light in the Brooder
Provide continuous lighting in the brooder during the first week in order to help chicks find water and feed.
Managing Temperature in the Brooder
Chick brooding temperature is usually measured just a few cm above the litter surface. The best times to observe the chicks and adjust the brooder temperature accordingly is during the cold times of the day. Not all farmers have thermometers to record temperatures so the best guide should be how the chicks behave during the cold hours:-
- When there is too much heat, chicks will move away from the heat source
- When there is too little heat, chicks will move towards the heat source
- When the heat is evenly distributed, the chicks will behave normally and move around throughout the brooder guard.